| Programmatically downloading files in the browser | 您所在的位置:网站首页 › Download file Show › Programmatically downloading files in the browser |
Programmatically downloading files in the browser
|
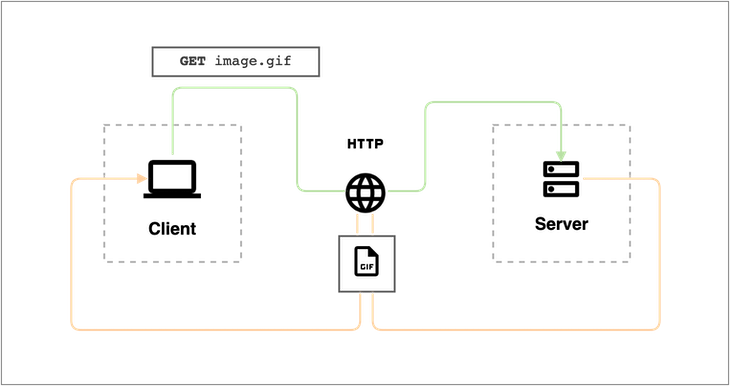
Editor’s note: This article was last updated by Ivan Garza on 3 May 2023 to revise content and include information about how to force a browser to download a file.  File downloading is a core aspect of the things we do on the internet. Tons of files get downloaded from the internet every day — from binary files like images, videos, and audio files, to plain text files, application files, and much more. Because of the importance of downloading files from the internet, it’s important to know how these files are downloaded, as well as the different methods for doing so. In this article, I will demonstrate how to download files from the internet, both by enforcing the download from the website, as well as with a manual click. After that, we will go over content generation in various forms, how to download generated content, and understanding the download attribute. Lastly, we will go over the usage of blobs and object URLs: Jump ahead: How to fetch a file from a client Enforcing file download How to programmatically download a file in HTML The download attribute Example 1: CSV generation from JSON array Example 2: Image pixel manipulation using the Canvas API Blobs and object URLs Obtaining blobs Reading blob content Object URLs Creating and releasing object URLs Using object URLs Downloading generated content How to fetch a file from a clientTraditionally, the file to be downloaded is first requested from a server by a client , such as a user’s web browser. The server then returns a response containing the contents of the file, as well as some instructional headers specifying how the client should download the file:
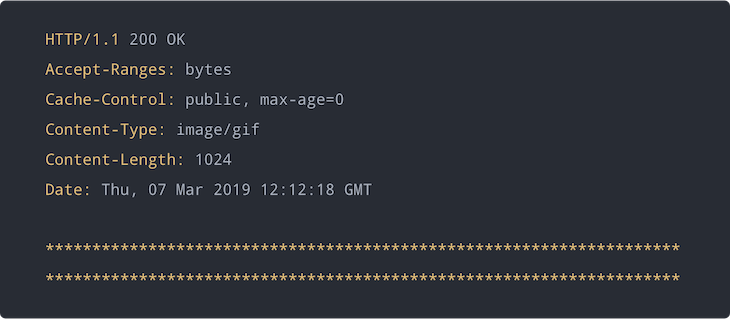
In this diagram, the green line shows the flow of the request from the client to the server over HTTP. The orange line shows the flow of the response from the server back to the client. Though the diagram indicates the communication flow, it does not explicitly show what the request from the client looks like or what the response from the server looks like either. Here is what the response from the server could possibly look like:
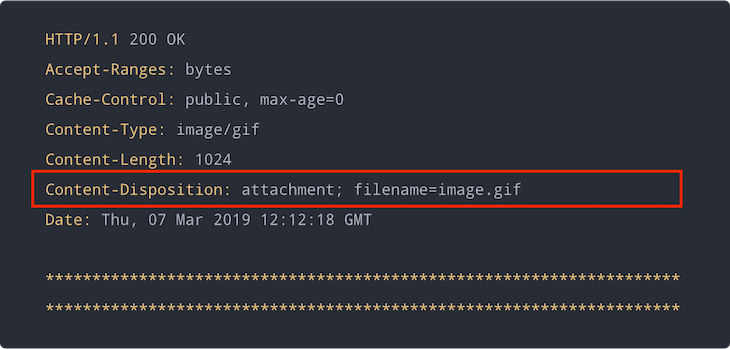
In this response, the server simply serves the raw contents of the resource (represented with the final two rows of asterisks — *), which will be received by the client. The response also contains headers that give the client some information about the nature of the contents that it receives. For this example response, the Content-Type and Content-Length headers provide that kind of information. Given the example HTTP response from above, our web browser client would simply display or render the GIF image instead of downloading. For the purposes of this writing, what we would actually want is for the GIF or image to be downloaded instead of displayed. For this, an extra header will be needed to tell the client to automatically download the contents of the file. Enforcing file downloadTo inform the client that the contents of the resource are not meant to be displayed, the server must include an additional header in the response. The Content-Disposition header is the right header for specifying this kind of information. The Content-Disposition header was originally intended for mail user-agents , because emails are multipart documents that may contain several file attachments. However, it can be interpreted by several HTTP clients, including web browsers. This header provides information on the disposition type and disposition parameters. The disposition type is usually one of the following: Inline : The body part is intended to be displayed automatically when the message content is displayed Attachment: The body part is separate from the main contents of the message and should not be displayed automatically except when prompted by the userThe disposition parameters are additional parameters that specify information about the body part or file, such as filename, creation date, modification date, read date, size, etc. Here is what the HTTP response for the GIF image should look like to enforce file download:
Now the server enforces a download of the GIF image. Most HTTP clients will prompt the user to download the resource contents when they receive a response from a server like the one above. How to programmatically download a file in HTMLLet’s say you have the URL to a downloadable resource. When you try accessing that URL on your web browser, it prompts you to download the resource file — whatever the file is.  Over 200k developers use LogRocket to create better digital experiences
The scenario described above is not feasible in web applications. For web apps, the desired behavior would be more akin to downloading a file in response to a user interaction. For example, the user clicking a button that reads “Download.” Achieving such a behavior in the browser is possible with HTML anchor elements: . Anchor elements are useful for adding hyperlinks to other resources and documents directly from an HTML file. The URL of the linked resource is specified in the href attribute of the anchor element. Here is an example of a conventional HTML anchor element linking to a PDF document:
In HTML 5, a new download attribute was added to the anchor element. The download attribute is used to inform the browser to download the URL instead of navigating to it — hence, a prompt shows up, requesting that the user saves the file. The download attribute can be given a valid filename as its value. However, the user can still modify the filename in the save prompt that pops up. There are a few noteworthy facts about the behavior of the download attribute: In compliance with the same-origin policy, this attribute only works for same-origin URLs. So, it cannot be used to download resources served from a different origin Besides HTTP(s) URLs, it also supports blob: and data: URLs , which makes it very useful for downloading contents generated programmatically with JavaScript For URLs with an HTTP Content-Disposition header that specifies a filename, the header filename has a higher priority than the value of the download attributeHere is the updated HTML anchor element for downloading the PDF document:
With the advent of HTML5 and new Web APIs, it has become possible to do a lot of complex tasks in the browser using JavaScript without ever having to communicate with a server. There are now Web APIs that can be used to programmatically: Draw and manipulate images or video frames on a canvas — Canvas API Read the contents and properties of files or even generate new data for files — File API Generate object URLs for binary data — URL APIIn this section, we will examine how we can programmatically generate content using Web APIs on the browser. Let’s consider two common examples. Example 1 : CSV generation from JSON arrayIn this example, we will use the Fetch API to asynchronously fetch JSON data from a web service and transform the data to form a string of comma-separated values that can be written to a CSV file. Here is a breakdown of what we are about to do: Fetch an array collection of JSON objects from an API Extract selected fields from each item in the array Reformat the extracted data as CSVHere is what the CSV generation script can look like: function squareImages({ width = 1, height = width } = {}) { return width / height === 1; } function collectionToCSV(keys = []) { return (collection = []) => { const headers = keys.map(key => `"${key}"`).join(','); const extractKeyValues = record => keys.map(key => `"${record[key]}"`).join(','); return collection.reduce((csv, record) => { return (`${csv}\n${extractKeyValues(record)}`).trim(); }, headers); } } const exportFields = [ 'id', 'author', 'filename', 'format', 'width', 'height' ]; fetch('https://picsum.photos/list') .then(response => response.json()) .then(data => data.filter(squareImages)) .then(collectionToCSV(exportFields)) .then(console.log, console.error);Here we are fetching a collection of photos from the Picsum Photos API. We are using the global fetch() function provided by the Fetch API, filtering the collection, and converting the collection array to a CSV string. The code snippet simply logs the resulting CSV string to the console. First, we define a squareImages filter function for filtering images in the collection with equal width and height. Next, we define a collectionToCSV higher-order function. This takes an array of keys and returns a function that takes an array collection of objects and converts it to a CSV string, extracting only the specified keys from each object. Finally, we specify the fields we want to extract from each photo object in the collection in the exportFields array. Here is what the output could look like on the console:
In this example, we will use the Canvas API to manipulate the pixels of an image, making it appear in grayscale. Here is a breakdown of what we are about to do: Set the canvas dimensions based on the image Draw the image on a canvas Extract and transform the image pixels on the canvas to grayscale Redraw the grayscale pixels on the canvasLet’s say we have a markup that looks like this:
Below is a comparison between an actual image and the corresponding grayscale canvas image:
Before we learn how we can download content generated programmatically in the browser, let’s look at a special kind of object interface called Blob, which has already been implemented by most of the major web browsers. Blobs are objects that are used to represent raw immutable data. Blob objects store information about the type and size of the data they contain, making them very useful for storing and working file contents on the browser. In fact, the File object is a special extension of the Blob interface. Obtaining blobsBlob objects can be obtained from a few different sources: Blobs can be created from non-blob data using the Blob constructor Blobs can be sliced from an already existing blob object using the Blob.slice() method Blobs can be generated from Fetch API responses or other Web API interfacesHere are some code samples for the aforementioned blob object sources: const data = { name: 'Glad Chinda', country: 'Nigeria', role: 'Web Developer' }; // SOURCE 1: // Creating a blob object from non-blob data using the Blob constructor const blob = new Blob([ JSON.stringify(data) ], { type: 'application/json' }); const paragraphs = [ 'First paragraph.\r\n', 'Second paragraph.\r\n', 'Third paragraph.' ]; const blob = new Blob(paragraphs, { type: 'text/plain' }); // SOURCE 2: // Creating a new blob by slicing part of an already existing blob object const slicedBlob = blob.slice(0, 100); // SOURCE 3: // Generating a blob object from a Web API like the Fetch API // Notice that Response.blob() returns a promise that is fulfilled with a blob object fetch('https://picsum.photos/id/6/100') .then(response => response.blob()) .then(blob => { // use blob here... }); Reading blob contentIt is one thing to obtain a blob object and another thing altogether to work with it. One thing you want to be able to do is to read the contents of the blob. That sounds like a good opportunity to use a FileReader object. A FileReader object provides some very helpful methods for asynchronously reading the contents of blob objects or files in different ways. The FileReader interface has pretty good browser support. At the time of writing, FileReader supports reading blob data as follows: as text — FileReader.readAsText() as binary string — FileReader.readAsBinaryString() as base64 data URL — FileReader.readAsDataURL() as array buffer — FileReader.readAsArrayBuffer()Building on the Fetch API example we had before, we can use a FileReader object to read the blob as follows: fetch('https://picsum.photos/id/6/240') .then(response => response.blob()) .then(blob => { // Create a new FileReader innstance const reader = new FileReader; // Add a listener to handle successful reading of the blob reader.addEventListener('load', () => { const image = new Image; // Set the src attribute of the image to be the resulting data URL // obtained after reading the content of the blob image.src = reader.result; document.body.appendChild(image); }); // Start reading the content of the blob // The result should be a base64 data URL reader.readAsDataURL(blob); }); Object URLsThe URL interface allows for creating special kinds of URLs called object URLs, which are used for representing blob objects or files in a very concise format. Here is what a typical object URL looks like: blob:https://cdpn.io/de82a84f-35e8-499d-88c7-1a4ed64402eb Creating and releasing object URLsThe URL.createObjectURL() static method makes it possible to create an object URL that represents a blob object or file. It takes a blob object as its argument and returns a DOMString, which is the URL representing the passed blob object. Here is what it looks like: const url = URL.createObjectURL(blob);It is important to note that this method will always return a new object URL each time it is called, even if it is called with the same blob object. Whenever an object URL is created, it stays around for the lifetime of the document on which it was created. Usually, the browser will release all object URLs when the document is being unloaded. However, it is important that you release object URLs whenever they are no longer needed in order to improve performance and minimize memory usage. The URL.revokeObjectURL() static method can be used to release an object URL. It takes the object URL to be released as its argument. Here is what it looks like: const url = URL.createObjectURL(blob); URL.revokeObjectURL(url); Using object URLsObject URLs can be used wherever a URL can be supplied programmatically. For example: They can be used to load files that can be displayed or embedded in the browser, such as images, videos, audios, PDFs, etc., for example, by setting the src property of an Image element They can be used as the href attribute of an element, making it possible to download content that was extracted or generated programmatically Downloading generated contentSo far, we have looked at how we can download files that are served from a server and sent to the client over HTTP , which is essentially the traditional flow. We have also seen how we can programmatically extract or generate contents in the browser using Web APIs. In this section, we will examine how we can download programmatically generated contents in the browser, leveraging all we have learned from the beginning of the article and what we already know about blobs and object URLs. Creating the download linkFirst, let’s say we have a blob object by some means. We want to create a helper function that allows us to create a download link ( element) that can be clicked in order to download the contents of the blob, just like a regular file download. The logic of our helper function can be broken down as follows: Create an object URL for the blob object Create an anchor element () Set the href attribute of the anchor element to the created object URL Set the download attribute to the filename of the file to be downloaded. This forces the anchor element to trigger a file download when it is clicked If the link is for a one-off download, release the object URL after the anchor element has been clickedHere is what an implementation of this helper function will look like: function downloadBlob(blob, filename) { // Create an object URL for the blob object const url = URL.createObjectURL(blob); // Create a new anchor element const a = document.createElement('a'); // Set the href and download attributes for the anchor element // You can optionally set other attributes like `title`, etc // Especially, if the anchor element will be attached to the DOM a.href = url; a.download = filename || 'download'; // Click handler that releases the object URL after the element has been clicked // This is required for one-off downloads of the blob content const clickHandler = () => { setTimeout(() => { URL.revokeObjectURL(url); removeEventListener('click', clickHandler); }, 150); }; // Add the click event listener on the anchor element // Comment out this line if you don't want a one-off download of the blob content a.addEventListener('click', clickHandler, false); // Programmatically trigger a click on the anchor element // Useful if you want the download to happen automatically // Without attaching the anchor element to the DOM // Comment out this line if you don't want an automatic download of the blob content //a.click(); // Return the anchor element // Useful if you want a reference to the element // in order to attach it to the DOM or use it in some other way return a; }Notice that the helper function contains a function call in line 31 that is commented out. This function may trigger an automatic download if we wanted to force the download of the file as soon as you access the website. In order to force the file download to happen automatically, uncomment line 31 from the script above to achieve that. Also notice that the helper function takes a filename as its second argument, which is very useful for setting the default filename for the downloaded file. The helper function returns a reference to the created anchor element (), which is very useful if you want to attach it to the DOM or use it in some other way. Here is a simple example: // Blob object for the content to be download const blob = new Blob( [ /* CSV string content here */ ], { type: 'text/csv' } ); // Create a download link for the blob content const downloadLink = downloadBlob(blob, 'records.csv'); // Set the title and classnames of the link downloadLink.title = 'Export Records as CSV'; downloadLink.classList.add('btn-link', 'download-link'); // Set the text content of the download link downloadLink.textContent = 'Export Records'; // Attach the link to the DOM document.body.appendChild(downloadLink);Now that we have our download helper function in place, we can revisit our previous examples and modify them to trigger a download for the generated contents. 1. CSV generation from JSON arrayWe will update the final promise .then handler to create a download link for the generated CSV string and automatically click it to trigger a file download using the downloadBlob helper function we created in the previous section. Here is what the modification should look like: fetch('https://picsum.photos/list') .then(response => response.json()) .then(data => data.filter(squareImages)) .then(collectionToCSV(exportFields)) .then(csv => { const blob = new Blob([csv], { type: 'text/csv' }); downloadBlob(blob, 'photos.csv'); }) .catch(console.error);Here we updated the final promise .then handler as follows. First, we create a new blob object for the CSV string, also setting the correct type using: { type: 'text/csv' }Then, we call the downloadBlob helper function to trigger an automatic download for the CSV file, specifying the default filename as “photos.csv”. Next, we move the promise rejection handler to a separate .catch() block: .catch(console.error)Here is a working and more advanced example of this application on Codepen: See the Pen JSON Collection to CSV by Glad Chinda (@gladchinda) on CodePen. 2. Image pixel manipulationWe will add some code to the end of the load event listener of the imgobject, to allow us: Create a blob object for the grayscale image in the canvas using the Canvas.toBlob() method Then, we’ll create a download link for the blob object using our downloadBlob helper function from before Finally, we’ll append the download link to the DOMHere is what the update should look like: img.addEventListener('load', () => { /* ... some code have been truncated here ... */ ctx.putImageData(imageData, 0, 0); // Canvas.toBlob() creates a blob object representing the image contained in the canvas // It takes a callback function as its argument whose first parameter is the canvas.toBlob(blob => { // Create a download link for the blob object // containing the grayscale image const downloadLink = downloadBlob(blob); // Set the title and classnames of the link downloadLink.title = 'Download Grayscale Photo'; downloadLink.classList.add('btn-link', 'download-link'); // Set the visible text content of the download link downloadLink.textContent = 'Download Grayscale'; // Attach the link to the DOM document.body.appendChild(downloadLink); }); }, false);Here is a working example of this application on Codepen: See the Pen Image Pixel Manipulation — Grayscale by Glad Chinda (@gladchinda) on CodePen. ConclusionWe’ve covered a lot of ground in this tutorial. We explored the basics of the client-server relationship, and the way the former requests a file from the latter, to download files using HTML. We also generated our own content, and explored blobs and object URLs. All in all, the importance of downloading files through the internet browser or a web application will remain a central topic of web development in general. This is why it is crucial to understand the different methods of download. |

 ) For Resource Download " width="730" height="108">
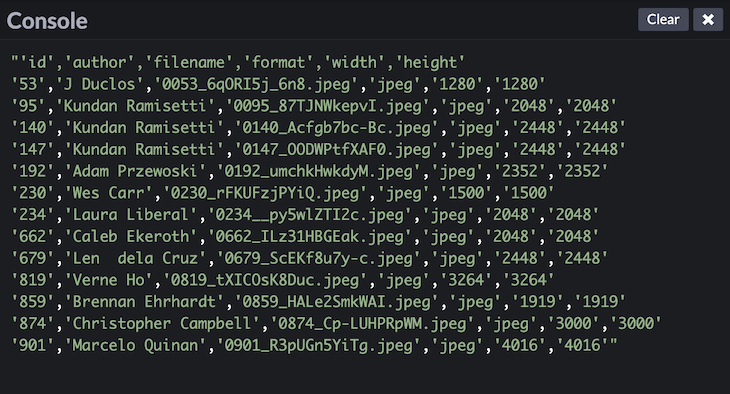


【本文地址】
| 今日新闻 |
| 推荐新闻 |
| 专题文章 |